
What product are you having issues with?
Broadband
Because we’ve invested over half a billion Euro in our Fiber Power Network, Virgin Media can now offer you lightning fast speeds. Enjoy endless online entertainment, connect with friends and family instantly, download videos, share your photos and stream online games in super-fast time
Quick Guides
Watch How to get the best wifi experience from your virgin media hub
Understanding Wireless and Wired Connectivity
Wireless and wired connections both have great benefits, but they do have some drawbacks too. Check out the tables below for more info.
Wired connections

Wireless connections

You may decide that a mixture of wired and wireless connections together is what’s best for your setup. For example, you might want to have your games console hooked up with a wired connection for best performance while your laptop uses a wireless connection so that you’re not tied down where you use it.
For more information on getting the most of your wireless connection please visit our guide here:
Getting the best wireless signal
Running a Speed Test
Speed is really important – whether you're gaming, downloading, or just looking to enjoy buffer-free content on your screen. You’ll know your speed is less than it should be if it’s taking a long time to open a web page or download a single song, for example.
As part of your regular maintenance, it's a good idea to run a speed test every now and then – you can use our handy speed test tool to let you know if you're red-hot or stone-cold. This tool uses Adobe Flash, so if you are using a device that does not have it you can install Adobe Flash now.
1. Before you start, close down all other applications as you don’t want sluggish applications interfering with the measurement of your internet speed.
2. Click on the Begin Test button in the speed test window.
3. Allow the test to run through its 3 tests: latency, download speed and upload speed.*
4. Once the test is finished, you will be presented with a set of results. If they fall below your expectations, check out the broadband hints and tips section. This will help you to understand the result you get from the speed test - as well as showing you some simple ways of improving your broadband speed.
5. If the speed of your connection is still poor, please get in touch with our customer service team as you should be enjoying the fastest broadband in Ireland – full stop.
Understanding Upload, Download speeds and Latency
Upload
Refers to the speed with which you can send content. This could be sending an email, uploading photos to a website or a video to You Tube.
Download
Refers to the speed with which you can receive content from the Internet. This means how quickly you can download a music track, view your favourite show online, etc. These are both measured in Megabits per second (Mbps).
Latency
Is the measure of the time (milliseconds) taken to send a packet of information from your computer to the internet and back again. This information is important for gamers, who want the actions they input into the controller to be reflected in the game as quickly as possible. In other words, if you hit someone with a sword, you want to see him collapse immediately – not five seconds later.
Watch: how to get the best Wifi experience from your Virgin Media Hub
Watch: Connecting to a Virgin Media network using an android device
Watch: Connecting to a Virgin Media network using Windows 8
Watch: Connecting to a Virgin Media network using Windows 10
Watch: Connecting to a Virgin Media network using a Mac
Watch: Connecting to a Virgin Media network using an Apple device
FAQs
Digital TV
Quick Guides
Tips and tricks to sort any issues with your Digital TV
Step 2
Confirm that you have selected the correct AV/HDMI channel on your TV.
Step 3
Reset your Digital TV Box:
1. Unplug your Digital set-top box from the main power supply.
2. Wait for approximately 15 seconds, and then plug your Digital set-top box back into the main power supply.
3. Confirm that you can see RTÉ One and your other channels
4. You may be required to enter a 3-digit activation code when you power on your Digital set top box. We have a handy guide to get the activation codes
How to check the Digital+ connection leads?
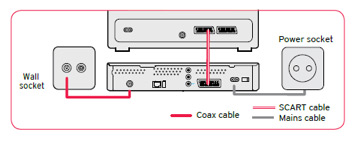
Most of the most common faults our customers come across with their TV service can easily be sorted just by checking your connection leads.
Firstly, check that all of the leads at the back of your Digital+ are securely connected at both ends. The following diagrams should help you to check your connections are correct.
Step 1
Connect one end of the coax cable to your wall socket and the other end to the ‘RF In’ socket on the back of your Digital+ box.

Step 2
Step 2. Connect the SCART lead from the SCART connection marked ‘TV’ on the back of your Digital+ box to the SCART connection on the back of your TV. Connect the mains cable to the back of your Digital+ box and plug it into the nearest mains socket. Switch on both units.
How to check the Digital set-top box connection leads
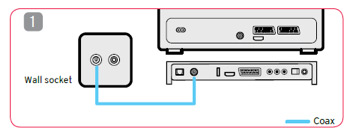
Most of the most common faults our customers come across with their TV service can easily be sorted by checking your connection leads.
Firstly, check that all of the leads at the back of your Digital set-top box are securely connected at both ends. The following diagrams should help you to check your connections are correct.
Step 1
Connect one end of the coax cable to your wall socket and the other end to the RF In socket on the back of your Digital set-top box.
Step 2
If you have a HDTV, connect the HDMI lead provided from the HDMI connection at the back of the set-top box marked HDMI to any free HDMI connection on your TV. Please take note of the HDMI connection you’ve used on your TV, as this is the channel that your TV must be tuned to in order to view the channels on your Digital set-top box.
If you do not have a HDMI connection on your TV, please use the SCART cable provided instead. Connect the SCART cable from the connection at the back of the set-top box marked SD TV-SCART to any free SCART socket on your TV. Please note, you should never connect both the HDMI and the SCART cable.

Step 3
Connect the mains cable from your Digital set-top box to a mains supply

FAQs
Virgin TV
Quick Guides
Connecting Virgin TV to your existing network
Don’t worry - connecting your Virgin TV HD+ box to your existing home network is fairly simple and requires no real techie expertise:
- Start by pressing "MENU" on your remote control.
- Then scroll to the "SETTINGS" menu and press "OK" on your remote control.
- Now select "HOME NETWORK SETTINGS" and then select "SET UP YOUR HOME NETWORK".
- In the setup menu, choose "JOIN NETWORK". The Virgin TV HD+ box will scan for existing networks.
You will now be asked whether you would like to connect by Ethernet or by Wi-Fi.
- If you select ethernet, the Virgin TV HD+ box will now scan for an active network for a DHCP server to obtain an IP address. As soon as an IP address has been assigned, the
following message is displayed: "Your Box is now connected to your home network. Please select "SET UP HOME MEDIA" to continue the set up procedure."
The Virgin TV HD+ box now acts as a ‘client’. It’s a techie term, so ignore it for now. At this point, you can install your media catalogue by selecting "SET UP HOME MEDIA".
- If you select Wi Fi, the Virgin TV HD+ box will display list of wireless networks to connect to. Locate your own network on the list, press "OK" and then enter your wireless password. Another way of doing the job is to can choose "MANUAL ENTRY" which will allow you to enter your network name and wireless password.
The Virgin TV HD+ box establishes a connection with the existing router. At this point, you can install your media catalogue by selecting "SET UP HOME MEDIA."
To leave the home network:
- Just press "MENU" on your remote control.
- Scroll to the "SETTINGS" menu and press "OK" on your remote control.
- Select "HOME NETWORK SETTINGS" and select "SET UP YOUR HOME NETWORK".
- In the setup menu, choose "CREATE NETWORK". When prompted to allow a reboot, select "YES". The Virgin TV HD+ box will now leave the home network and return to "GATEWAY MODE".
Adjust the resolution and picture format on the Virgin TV HD+ Box
If you take a minute or two to sort this, it can greatly improve how you enjoy your telly content. It’s a fairly simple process to access the picture/video settings on your Virgin TV HD+ box – here’s all you need to do:
- Press "MENU" on your remote control.
- Scroll to "SETTINGS" and press "OK" on your remote control.
- Select "AUDIO/VIDEO SETTINGS" and press "OK".
- Select "VIDEO SETTINGS" and press "OK".
To adjust the resolution on your Virgin TV HD+ box:
- Select "HD RESOLUTION" and press "OK". You can now choose your preferred resolution setting or "FOLLOW TV RESOLUTION". Select your desired option and press "OK" on your remote control to confirm your choice.
To adjust the picture format on your Virgin TV HD+ box:
- Select "FORMAT CONVERSION" and press "OK".
- On your screen, choose the format you would like to display programmes in and press "OK" on your remote control to confirm the selection.
Restore factory settings on Virgin TV HD+
To restore the factory settings on your Virgin TV HD+ box:
Sometimes, if things go a little haywire, the only solution is to restore the factory settings – which means bringing everything on your HD+ box back to the state it was in when you first got it. It’s not difficult – here’s how to do it:
- Press "MENU" on your remote control.
- Scroll to "SETTINGS", select "ADVANCED SETTINGS" and press "OK" on your remote control.
- Select "HORIZON TV HD+ BOX" and press "OK".
- Select "FACTORY RESET" and press "OK".
- When prompted, enter your PIN. The default PIN is 0000.
On your screen, you will be asked if you would like to save your existing recordings:
- Select "YES" to keep your recordings, select "NO" to delete your recordings.
- Press "OK" on your remote control to confirm your choice.
On your screen, you will be asked if you would like to keep your current user settings or revert back to default values.
- To restore factory settings, select "RESET TO DEFAULT" and press "OK" on your remote control.
- When asked, select "YES" to confirm you want to revert to the factory settings.
Your Virgin TV HD+ box will now begin the reset process. Please allow up to 15 minutes for this to complete – so put the kettle on while it's doing its thing.
Getting the most from Virgin TV recordings
You want to get every bit of enjoyment from your Virgin TV recordings, so here are some top tips to make sure you never ever miss your favourite programmes.
First of all, have you ever missed a programme you thought you had recorded? This could be down to a very simple problem – not having enough free storage space on your Virgin TV box. The first thing to do is delete programmes that you’ve watched and are unlikely to watch again – maybe the evening news, for example. Next, use the handy Disk Space Management feature – it just takes 4 simple steps:
- Press the menu button on your remote control
- Select settings
- Select diagnostic and press ok
- Select disk space (5th item listed)
This will tell you how much space you have used. If you're getting perilously close to ‘FULL”. There are a number simple things you can do to manage your space.
Auto Delete
Your Virgin TV box is designed to make sure you never miss a future recording. To do this, we have built in an Auto delete feature that manages your recordings when your Hard drive is almost full. Your Virgin TV box will recognise that you do not have enough space to record a future recording and will then delete the oldest previously viewed recording (A viewed recording is one that has been played, even if only for a few seconds).
Switch off Auto Delete
By switching off ‘Auto Delete’, your box will never delete older recordings to make space for a new one. You can turn off ‘Auto Delete’ in your settings to ‘Never Delete Recordings’. Here’s how:
- Press the Menu button on your remote control
- Select Settings and press OK for Preferences
- Select Disk Space Management
- Select Never Delete Recordings
- Then click the Return to TV button on your remote control or click BACK to clear menus
Protect your favourite recordings
- There are some programmes that you’ll simply never want to delete. In that case, simply select the recorded programme you wish to protect
- Press OK and select the protect option from the menu list
- This programme will now remain in your recordings until you wish to unprotect it
To unprotect a recording, simply follow the above steps but select unprotect from the menu list this time.
The Auto Delete function does NOT delete your protected recordings.
Don’t forget: If you switch off Auto Delete, don’t forget to check back on a regular basis to make sure you have enough space for your planned recordings.
Here’s something you might not know
If you are recording high definition movies, they take up more storage space than standard definition movies. Recording The Hobbit in HD, for example, will take 6.5GB of space on your Virgin TV HD+ box. If you record it in standard definition, it will take up only 2.9GB of space.
FAQs
Home Phone
Quick Guides
What to do if you have connection problems?
It happens occasionally. If you’re having difficulty with your home phone, try these handy trouble-shooting tips first:
Step 1
Check for any updates that may be affecting the services we offer in your area using our Service Status Checker.
Step 2
To do this, unplug your modem and leave it off for 30 seconds before plugging it back in.
Step 3
Ensure that the cable from the base of the phone is connected to the “Tel1” Port at the back of your modem. Your home phone should now be working, so try making a call.
FAQs
